Getting started with knowledge graphs and LLM
Author: Dale Lewis
Role: Co-Founder CEO
Cloudiff Tutorial on RAG responses with Neo4j and Llama3 using Ollama and Langchain
A simple guide for running Llama3 locally with a Neo4j local instance to provide RAG enhanced LLM responses.
- Create a Neo4j instance locally
- Download Ollama and Llama3
- Install the dependencies
- Fill the graph with data
- Initialise the model and Connect to the Graph
- Run the prompt
- What next?
Instructions
Create a Neo4j instance locally
For this stage to ensure this is a ZERO cost blog I recommend downloading Neo4j desktop.
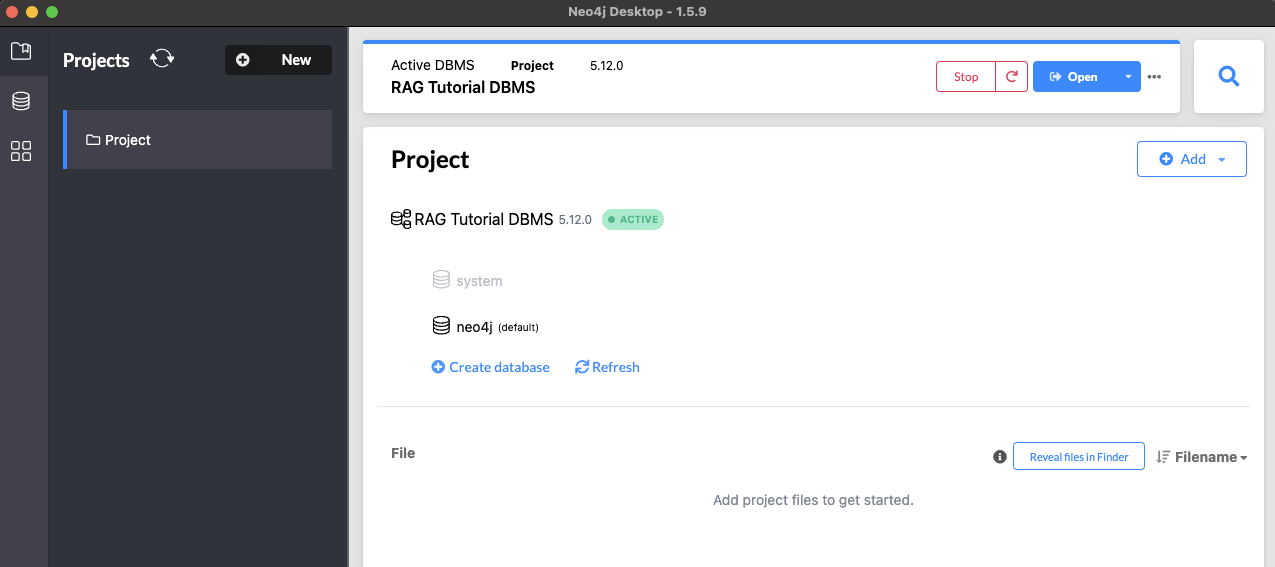
- Once downloaded create a Project and within that project create a DBMS:

- Now we need to enable the APOC Plugin
The APOC library consists of many (about 450) procedures and functions to help with many different tasks in areas like collections manipulation, graph algorithms, and data conversion.
To enable select the DBMS you just created and a Plugins tab will appear on the right hand side. Select APOC then install and restart (Just click the button).
Now are DBMS is ready to use and you can browse the DB by going to the Neo4j Browser
Download Ollama and Llama3
-
Simply go to the Ollama website and download
-
Once downloaded run:
ollama run llama3 -
This downloads the model we want to use for this tutorial.
Install the dependencies
Not 100% neccessary but you may want to download OpenSSL or you will recieve warnings.
Next we need to install the python packages we want to use.
pip install langchain
pip install langchain-community
pip install neo4j
Once complete we are ready to get our data together.
Fill the graph with data
Go to the Neo4j Browser and login using the neo4j user and the password you set. If you have forgotten the password don't stress just reset it in Neo4j Desktop. Once you are in the Browser run the following Cypher script.
Paste the entire script into the prompt and run it as once to get the results we desire. You can also run the file using python against Neo4j which isn't covered in this blog.
CREATE (person1:Person {name: "Ryan", role: "Project Owner"})
CREATE (person2:Person {name: "Dale", role: "Project Editor"})
CREATE (person3:Person {name: "Dan", role: "Project Editor"})
CREATE (person4:Person {name: "Leo", role: "Project Viewer"})
CREATE (person5:Person {name: "Roger", role: "Project Owner"})


CREATE (service1:Service {name: "Compute Engine"})
CREATE (service2:Service {name: "BigQuery"})
CREATE (service3:Service {name: "Cloud Storage"})
CREATE (service4:Service {name: "Cloud Sql"})

CREATE (location1:Location {name: "us-central1"})
CREATE (location2:Location {name: "europe-west2"})

CREATE (service1)-[:DEPLOYED_IN]->(location1)
CREATE (service2)-[:DEPLOYED_IN]->(location1)
CREATE (service3)-[:DEPLOYED_IN]->(location1)
CREATE (service4)-[:DEPLOYED_IN]->(location2)

CREATE (project1:PROJECT {name: "Super Awesome Project", id: "super-awesome-project"})
CREATE (project2:PROJECT {name: "Another Super Awesome Project", id: "another-super-awesome-project"})

CREATE (person1)-[:MANAGES]->(project1)
CREATE (person2)-[:EDITOR_OF]->(project1)
CREATE (person3)-[:EDITOR_OF]->(project2)
CREATE (person4)-[:VIEWER_OF]->(project2)
CREATE (person5)-[:MANAGES]->(project2)

CREATE (budget1:Budget {amount: 10000, currency: "USD"})
CREATE (project1)-[:HAS_BUDGET]->(budget1)

CREATE (budget2:Budget {amount: 40000, currency: "USD"})
CREATE (project2)-[:HAS_BUDGET]->(budget2)

CREATE (cost1:Cost {amount: 2000, currency: "USD", timestamp: "2024-06-11"})
CREATE (cost2:Cost {amount: 12000, currency: "USD", timestamp: "2024-06-11"})

CREATE(project1)-[:HAS_INCURRED]->(cost1)
CREATE(project2)-[:HAS_INCURRED]->(cost2)


CREATE (project1)-[:HAS_SERVICE]->(service1)
CREATE (project1)-[:HAS_SERVICE]->(service2)
CREATE (project2)-[:HAS_SERVICE]->(service3)
CREATE (project2)-[:HAS_SERVICE]->(service4)
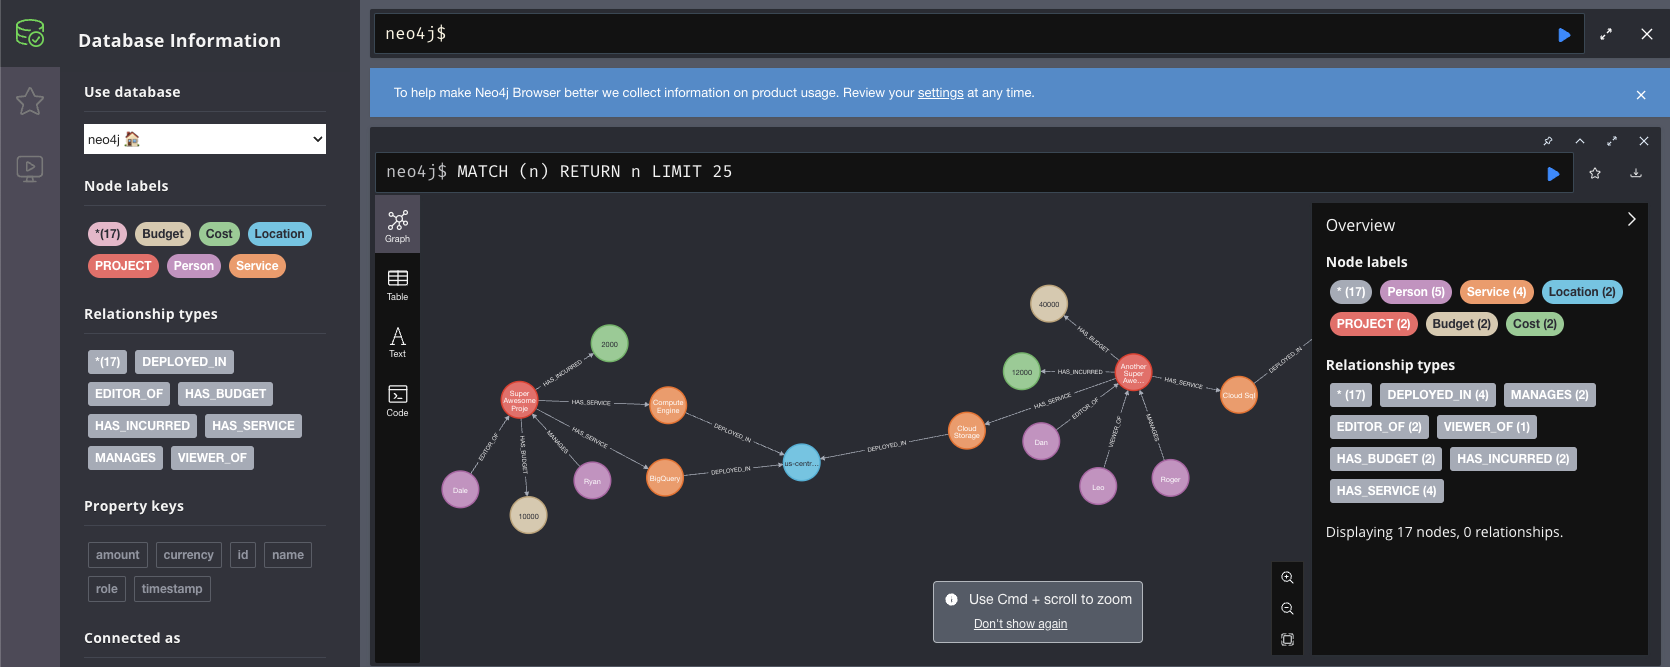
Once you have run the cypher query your graph should look something like this (You can drag the nodes to get the exact match): Command to show all nodes:
MATCH (n) RETURN n

Initialise the model and Connect to the Graph
Now we have our graph ready all we need is the python script and this section will cover initialising the model and connecting to Neo4j in Python. We will create 2 functions to achieve this:
from langchain_community.llms import Ollama
from langchain_community.graphs import Neo4jGraph
from langchain.chains import GraphCypherQAChain

def connect():
    url = "bolt://localhost:7687"
    username="neo4j"
    password="" # Update with your password
    graph = Neo4jGraph(url, username, password)
    return graph

def init_model():
    llm = Ollama(model="llama3:latest") # Ensure this is exactly the same image you used in the ollama run command or it will download another.
    return llm
Now we need a main to call these functions and a function to send our prompt and recieve the response from the model.
Run the prompt
To run the prompt we have to use the two functions we have created and a main to run everything.
def run_prompt(prompt, llm, graph):
    chain = GraphCypherQAChain.from_llm(
        llm, graph=graph, verbose=True
    ) # verbose=True shows us what cypher is running. Turn to false to recieve summary response.
    result = chain.invoke({"query": prompt})
    return result['result']

def main():
    graph = connect()
    llm = init_model()
    prompt = "Show me everyone that owns a Project?"
    result = run_prompt(prompt, llm, graph)
    print(result)

if __name__ == "__main__":
    main()
This very simple script allows us to connect to Neo4j and the Llama3 model and return RAG based responses. We achieved this with ZERO cost and on our local machines.
Run the sctipt and your results should look like this:

Change the prompt and experiment with the results.
Models can hallucinate as I'm sure you already know at this point. Using RAG reduced the hallucination.
What next?
- Follow us on LinkedIn for more tutorials and latest information on AI and RAG.
- Experiment with prompt templates to create reports from the responses instead of single line summaries.
- You can also layer the model and return the response from RAG into a model to see how it interpurates the results further.
- For more information and if you want to scale this into a production RAG system checkout Cloudiff.
Author: Dale Lewis
Role: Co-Founder CEO
